Did you know that you can actually insert PDF documents, files, and images as objects in your typical Word file? You can also do this to Excel and PowerPoint just by adding it as an object from your insert menu. By doing so, you are able to use these files for reference and showcase various files in one view. This method is also usually used for reports and portfolios, which is preferred by professionals for the purpose of content accessibility.
Read more: How to insert PDF in Word
Quite commonly, this strategy is confused over displaying images on your document. What’s the difference? Here’s a clear picture of how it looks like if a photo was inserted for display versus a PDF inserted as an object.

As you can see, the inserted object does not show the entire content directly but displays the file as an icon and allows the user to click and open it. The photo on the other hand is showcased with its content on the document itself.
How do I detach these files so I can save them on my computer?
Most of the time, accessing the file isn’t enough. We have to save them and review them again, later on, requiring us to detach and extract these files away from the main document so we can have faster and easier access. We can do this the basic way – by opening it one by one and saving it on the computer OR you can use a shortcut method to instantly extract all embedded files and save them in one folder. Here’s how it works:
Step one: Go to the location where you saved the Word (or Excel/PPT) file
Step two: The Word file with the inserted files is actually a compressed archive. To extract it, you need to rename your file format as a.ZIP

Step three: A warning will appear. Simply click “YES”

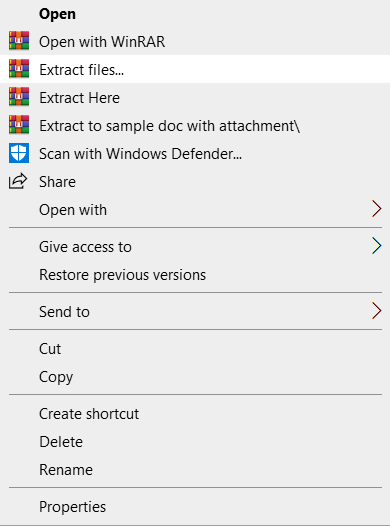
Step four: Right-click on the renamed file and click “EXTRACT FILES HERE” or you can also opt to choose the location where you want to extract the files.
Step five: Access all these files from the extracted folders. You will be able to see photos under the folder “WORD” then click “MEDIA” or you can click “EMBEDDINGS” for other file types.

The good thing about this process is the fact that it doesn’t require you to install or use any other tool. Renaming and extracting is an innate feature and .zip formats can be recognized by the modern computer with its built-in .zip support. If it doesn’t extract automatically, you can always download free wares online for .zip formats.
It is unfortunate though that the only way to extract PDF files is to click, open, and save them one by one. If you try to do the method above, you will notice that it will turn into a .BIN file instead of a PDF.
Why can’t I change the file format?
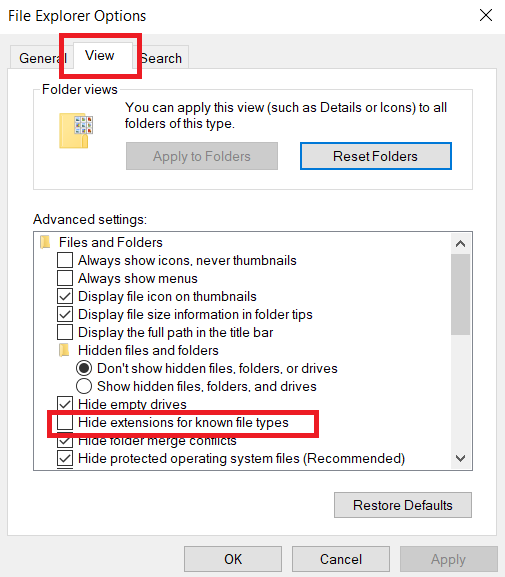
For new models, renaming the file type will seem like it’s not working at all. Why? Because on new computers, format extensions are simply not displayed. Even if you hit “F2” on the keyboard, you’re simply changing the file name and not the file extension. To be able to overcome this, follow these simple steps:
Step one: Open the Control settings
Step two: Find “FILE EXPLORER OPTIONS” or find “Show or Hide File Extension”

Step three: Click on the “View” tab and untick the box for “Hide extensions for known file types.” Once you’ve applied and click OK, you will now be able to see the whole name and file extension of all your files. When renaming the file, the extension will also be affected if attempted to change.
