Обновить
Обновить
Ask How

How to Easily Navigate in Word to Create a Highly Structured PDF

For readers to appreciate documents and data, an overview of the content should be presented on the first few pages. If the document is long, content outline and navigation is expected to help them find topics of their interest. It also helps them know what to expect and keeps all data organized. PDF bookmarks is usually the solution for such requirement however, plenty of people are already inclined to use MS Word as it is the most basic application familiar. The question is, how do you maximize the application so that the document becomes a highly structured file?

Adding Navigation Pane

The answer to the question above is simple. Adding a navigation pane makes a great difference to the document as a bookmark in PDF would. Using this would allow you to jump and browse through different sections of the document with just one click. In MS Word, its built-in heading styles is the secret for the navigational pane to work. By applying heading styles, an automatic navigation pane will follow the outline format and showcase these on the side so that the reader will be able to see the content in a structured summary. This pane not only allows you to jump from one place to another, it also allows you to reorganize sections just by dragging the headings on the pane.

How to Enable Navigation Pane

The default settings in MS Word doesn#38;rsquo;t show the pane right away but it can be accessed with two steps.

Step one: Click View on the top most menu bar

Step two: Tick the checkbox of the Navigation Pane. This will then display the pane on the left with a summary of all topics based on headings and subheadings.
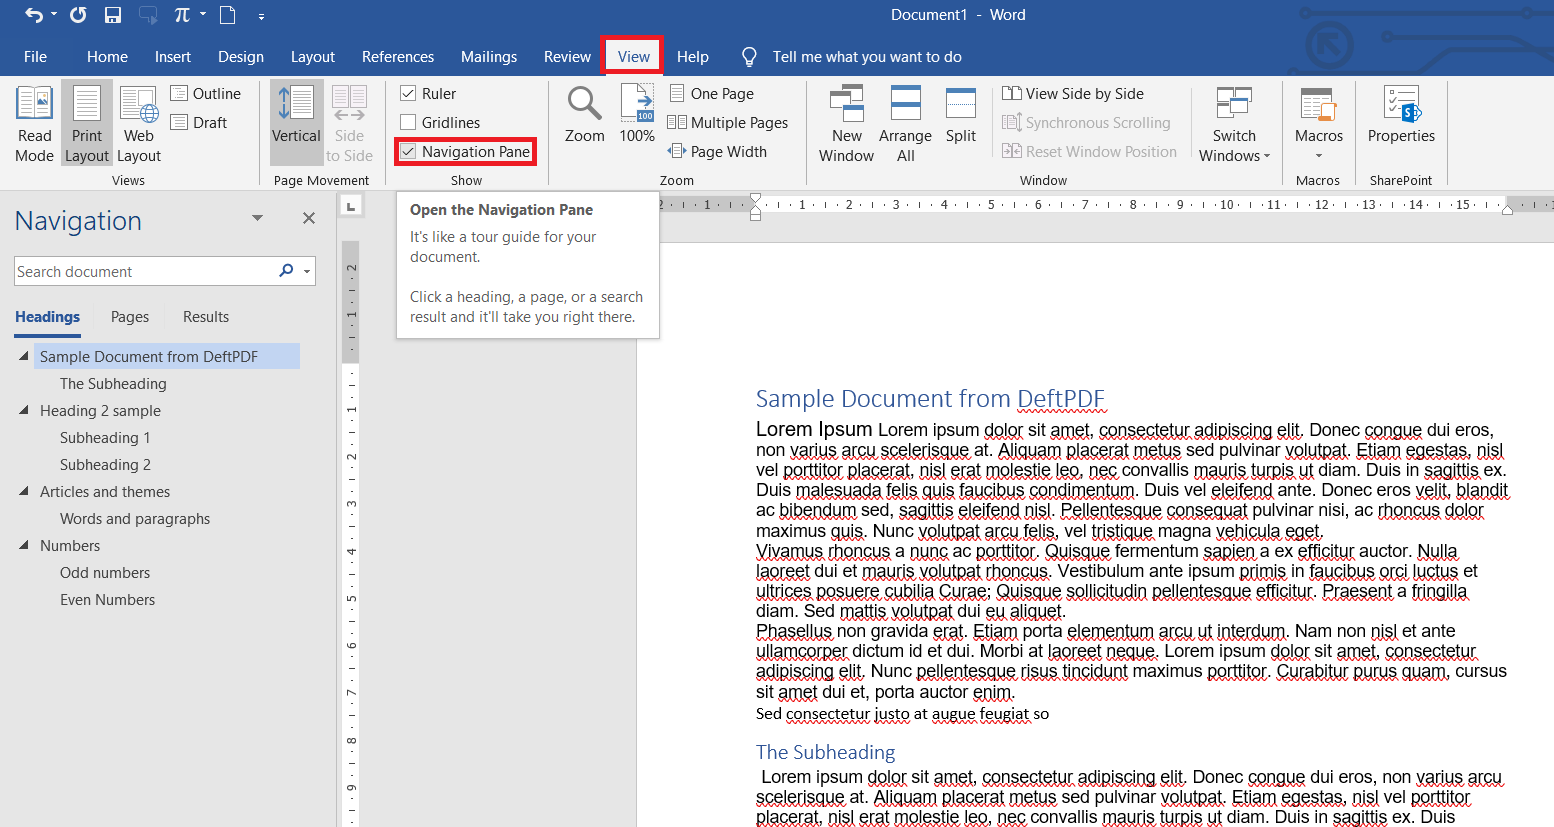
Note: The panes can accommodate up to 9 levels and for this to work, the default heading and subheading styles should be used on each part of the document.

Adding the Heading and Subheadings

Although the summary is automatically made on the pane but the built-in heading styles should be applied manually by the author. Section heads can be changed just by highlighting the keywords on your content then selecting the preferred style from the home tab.

Another way to add a section is to add a new heading directly using the pane. By doing so, a new heading with a default text is added on the area. It can be done by following these steps:

Step one: Choose the area where the new section will be added.

Step two: Right-click on the section nearest it and select #38;ldquo;New Heading Before#38;rdquo;

Step three: Change the default text if needed. Now if you need it to become a subheading, simply right-click on it and choose #38;ldquo;Demote#38;rdquo; or change it back into a heading by clicking #38;ldquo;Promote#38;rdquo;

Deleting Sections

The process is almost the same when adding or deleting sections. It can be done through a right-click action on the pane and selecting the desired result. When deleting a heading on the pane, take note though that the whole section will be deleted, including the contents and the subheadings under it. This is one way to efficiently reduce and remove unwanted content if necessary.

Reorganizing Content

The best and most convenient feature of the navigation pane is organizing the whole content by sections. By dragging headings and moving them above or below other headings, the whole sections of text on your document is actually moved. #38;nbsp;

Summary: What can you do with Navigation Pane?

In a gist, a navigation pane acts like bookmarks in your PDF file. While PDFs are much more recommended to use than Word for reasons that it is much more secure and lossless, Word however, can be your first step in creating a highly structured document which then later on can be converted to PDF. Take note though that the navigation pane will not be exported to the PDF as it is only a feature in MS Word to help you organize and create efficiently. Only the content and the formatting (headings and subheading structure) will be carried out in PDF format. Here#38;rsquo;s a summary of the functions that you can do with the pane:

1. Jump from one section to another

2. Control and reorganize the sections

3. View in thumbnails and click the pages, which also jump from one page to another

4. Adding sections and headings and subheadings

5. Deleting sections all at once

6. Reorganize your content

Exporting to PDF

After you have created your document, it#38;rsquo;s time to export to PDF to make it transfer-friendly and accessible to your readers. You can simply do this by #38;ldquo;saving as PDF,#38;rdquo; #38;ldquo;Print to PDF#38;rdquo; or converting your PDF file using DeftPDF.com online.

#38;nbsp;

Published 18 Oct 2020

For readers to appreciate documents and data, an overview of the content should be presented on the first few pages. If the document is long, content outline and navigation are expected to help them find topics of their interest. It also helps them know what to expect and keeps all data organized. PDF bookmarks are usually the solution for such a requirement however, plenty of people are already inclined to use MS Word as it is the most basic application familiar. The question is, how do you maximize the application so that the document becomes a highly structured file?

creating structured documents

Adding Navigation Pane

The answer to the question above is simple. Adding a navigation pane makes a great difference to the document as a bookmark in PDF would. Using this would allow you to jump and browse through different sections of the document with just one click. In MS Word, its built-in heading styles are the secret for the navigational pane to work. By applying heading styles, and automatic navigation pane will follow the outline format and showcase these on the side so that the reader will be able to see the content in a structured summary. This pane not only allows you to jump from one place to another, but it also allows you to reorganize sections just by dragging the headings on the pane.

How to Enable Navigation Pane

The default settings in MS Word don’t show the pane right away but it can be accessed with two steps.

Step one: Click View on the topmost menu bar

Step two: Tick the checkbox of the Navigation Pane. This will then display the pane on the left with a summary of all topics based on headings and subheadings.

Note: The panes can accommodate up to 9 levels and for this to work, the default heading and subheading styles should be used on each part of the document.

Adding the Heading and Subheadings

Although the summary is automatically made on the pane, the built-in heading styles should be applied manually by the author. Section heads can be changed just by highlighting the keywords on your content then selecting the preferred style from the home tab.

Another way to add a section is to add a new heading directly using the pane. By doing so, a new heading with a default text is added to the area. It can be done by following these steps:

Step one: Choose the area where the new section will be added.

Step two: Right-click on the section nearest it and select “New Heading Before”
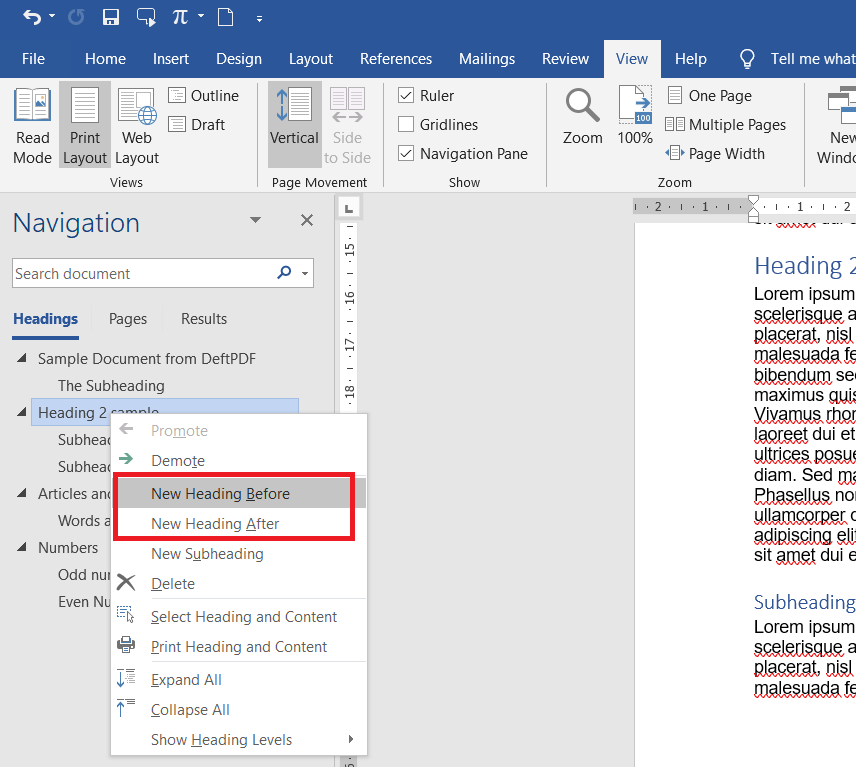
adding new headings and subheading

Step three: Change the default text if needed. Now if you need it to become a subheading, simply right-click on it and choose “Demote” or change it back into a heading by clicking “Promote”

Deleting Sections

The process is almost the same when adding or deleting sections. It can be done through a right-click action on the pane and select the desired action. When deleting a heading on the pane, take note though that the whole section will be deleted, including the contents and the subheadings under it. This is one way to efficiently reduce and remove unwanted content if necessary.

Reorganizing Content

The best and most convenient feature of the navigation pane is organizing the whole content by sections. By dragging headings and moving them above or below other headings, the whole sections of text on your document is actually moved.  
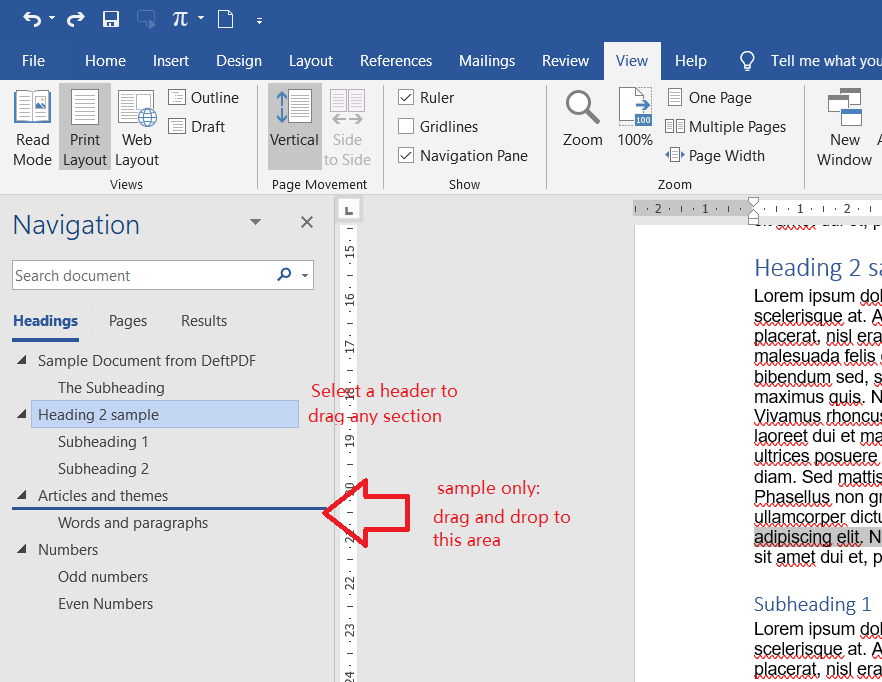
reorganizing sections

Summary: What can you do with Navigation Pane?

In a gist, a navigation pane acts like bookmarks in your PDF file. While PDFs are much more recommended to use than Word for reasons that it is much more secure and lossless, Word, however, can be your first step in creating a highly structured document which then, later on, can be converted to PDF. Take note though that the navigation pane will not be exported to the PDF as it is only a feature in MS Word to help you organize and create efficiencies. Only the content and the formatting (headings and subheading structure) will be carried out in PDF format. Here’s a summary of the functions that you can do with the pane:

1. Jump from one section to another

2. Control and reorganize the sections

3. View in thumbnails and click the pages, which also jump from one page to another

4. Adding sections and headings and subheadings

5. Deleting sections all at once

6. Reorganize your content

Exporting to PDF

After you have created your document, it’s time to export to PDF to make it transfer-friendly and accessible to your readers. You can simply do this by “saving as PDF,” “Print to PDF” or converting your PDF file using DeftPDF.com online.



Want to get updates and subscribe to our blog? Get weekly e-notifications by creating a free account with us:  DeftPDF online

close